Today’s post is written by Elizabeth Cardella
When you’re dealing with what is possibly your client’s largest asset, the sale of their house, it can be a bit overwhelming to think about how to properly market the house for the best results. As a real estate photographer, I recommend using a professional to shoot listing photos for your higher-end listings. Remember, the goal of listing photos is to get a potential buyer to schedule a showing. The photos themselves will not sell the house. However, they do play a huge part in showcasing the best parts of the home to drive showings.
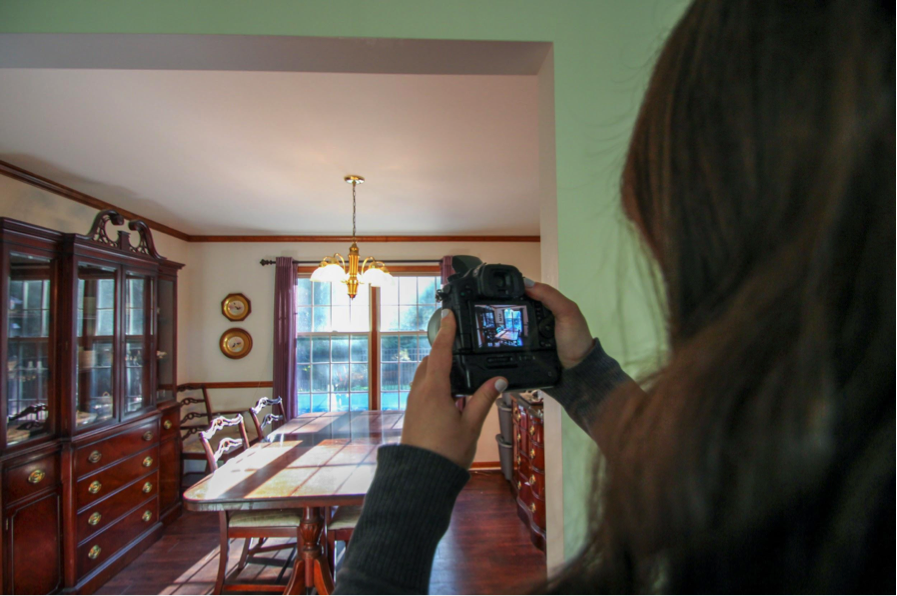
For some of your listings, you shouldn’t be afraid to take the listing photos yourself. I’ve put together a few tips to help improve your listing photos. As a preface: the photos in these examples are shot with a Canon Rebel T3i in Auto mode. This is a very reasonable camera, with the simplest settings. These tips will be helpful for both novice and advanced photographers.
TIP 1: Prep the House
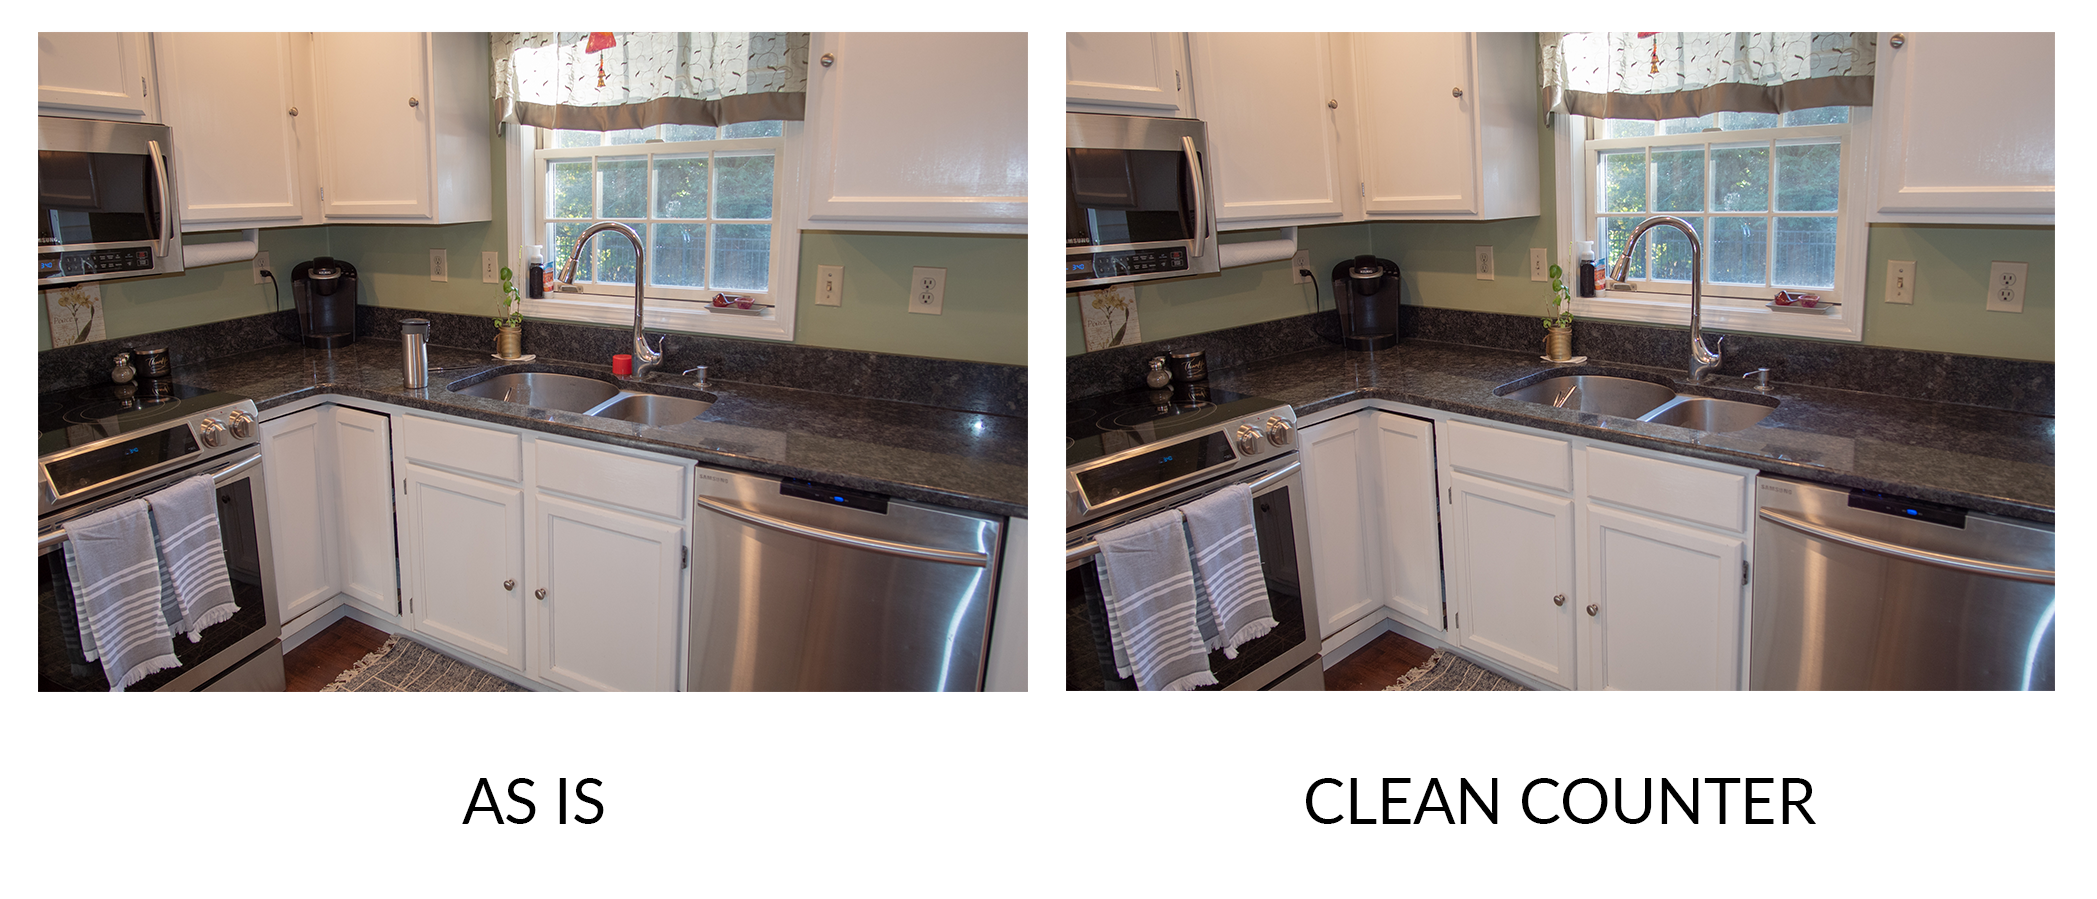
It’s always helpful to walk through the house before you start taking photos. Turn on all of the lights and open all of the curtains. You want to have as much natural light in the house as possible. The lights add some warmth to the photos. In the bathroom, close the toilet lid. Stow away some personal items if they are in clear view (toothbrushes, deodorant, etc). You want the potential buyer to see themselves in the house, but also want it to feel lived in and loved. There is a fine line between too many personal items and not enough. Watch for little items on counters and overflowing trash cans. You can move items out of the room for the photo and then put them back.
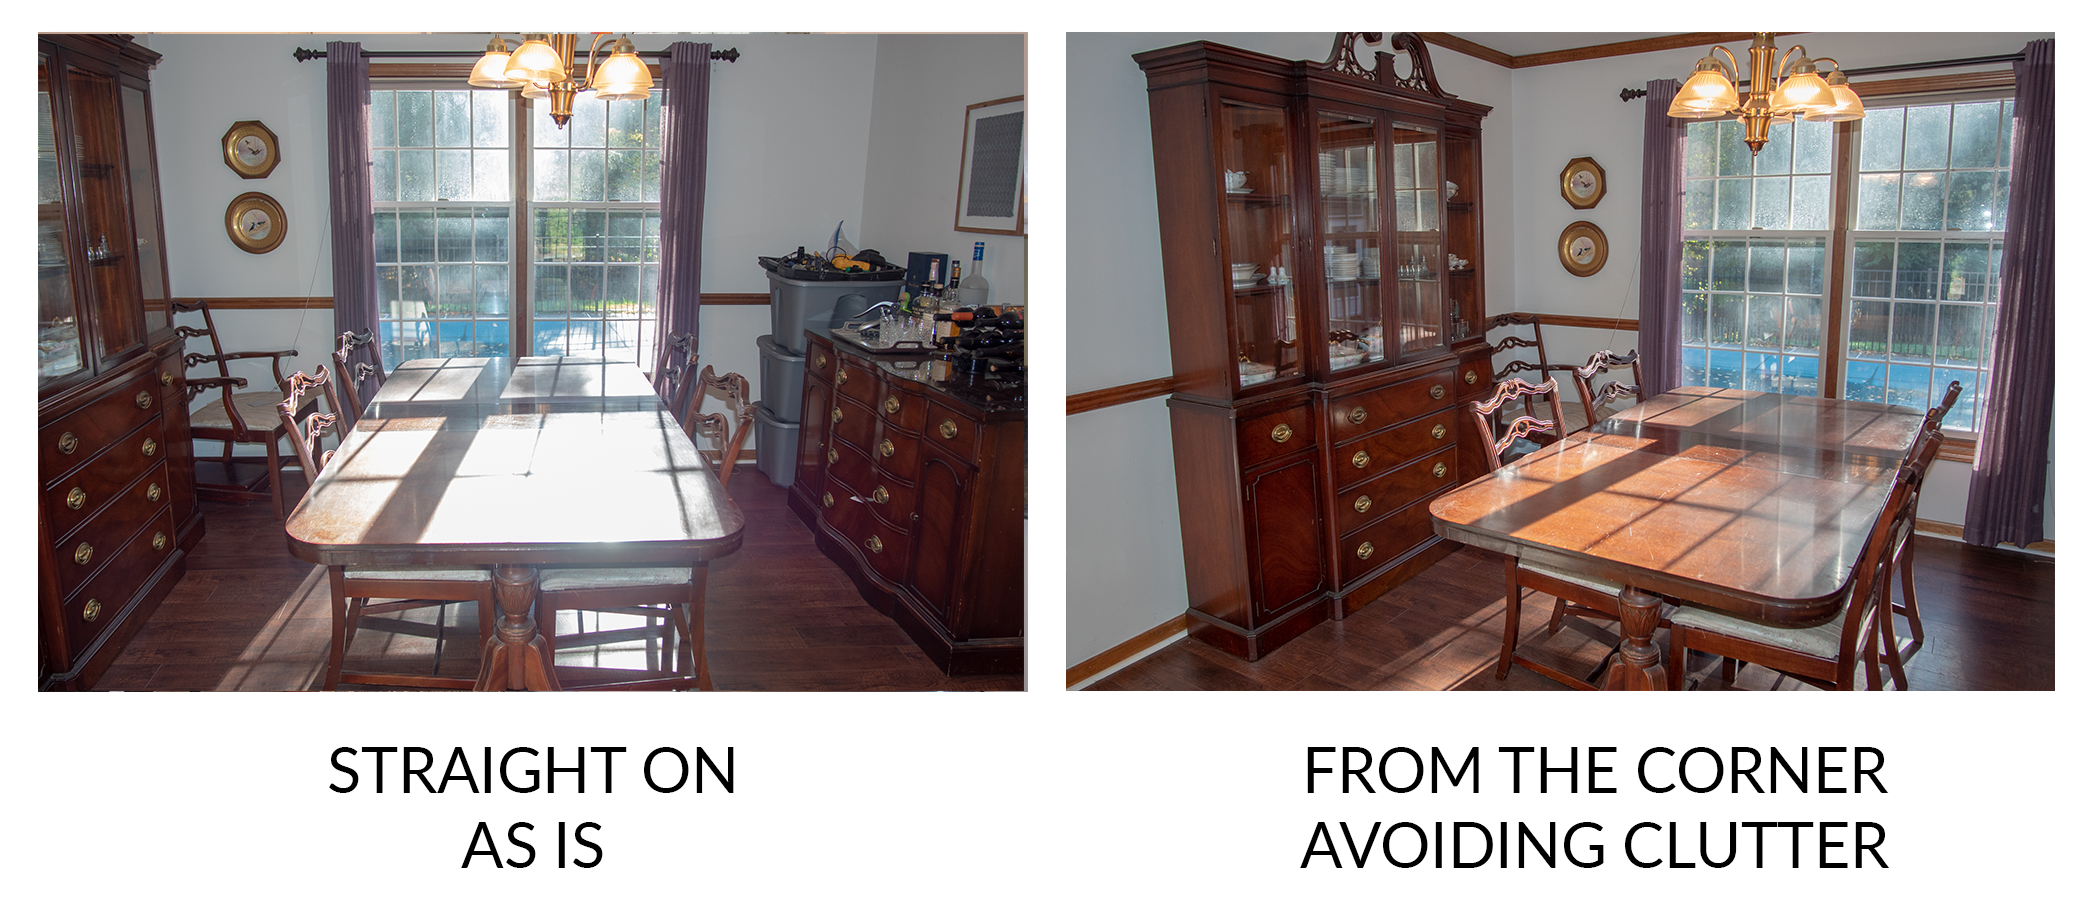
 TIP 2: Shoot Smart
Sometimes a slight shift in your location can make a huge difference in your photos. For example, if you take a photo from the corner of a room it can make the room look bigger than if you took the photo from the center of the room. Also, look for ways to show depth. If you can, take a photo of one room that will naturally lead you to another room. Show off the open concept. Realize what you want to emphasize, like countertops or newly refinished floors, and use the photos to enhance those aspects. Your clients are usually in the process of moving or starting to pack, so try to avoid clutter or boxes in your photo.
 For bathrooms, I usually shoot from a higher angle (looking down). It tends to make it more appealing. Remember that the goal of the photos is to make people want to see the house, so show off its best features. It’s OK to omit a room or avoid a wall if necessary. In addition, I try not to show too much ceiling. A lot of the listing photos I see are angled up toward the ceiling so much that it covers at least 1/3 of the photo. Unless the ceiling is particularly interesting, it doesn’t need to be so prominent.
TIP 3: Use Flash
If you’re shooting in Auto mode, the camera will most likely use flash in dark scenarios. If you’ve opened all of the curtains and turned on the lights, you may think that it’s bright enough that you don’t need to use flash. The truth is, flash doesn’t just light up the room, but it fills in the shadows and gives a more natural look to a space. When you look around your living space, your eyes will automatically adjust so that you can see both bright and dark spaces evenly. The camera is less complex. Even by adding the light from an onboard flash (already attached to the camera) you can see a major difference. Take a look at the comparison below:
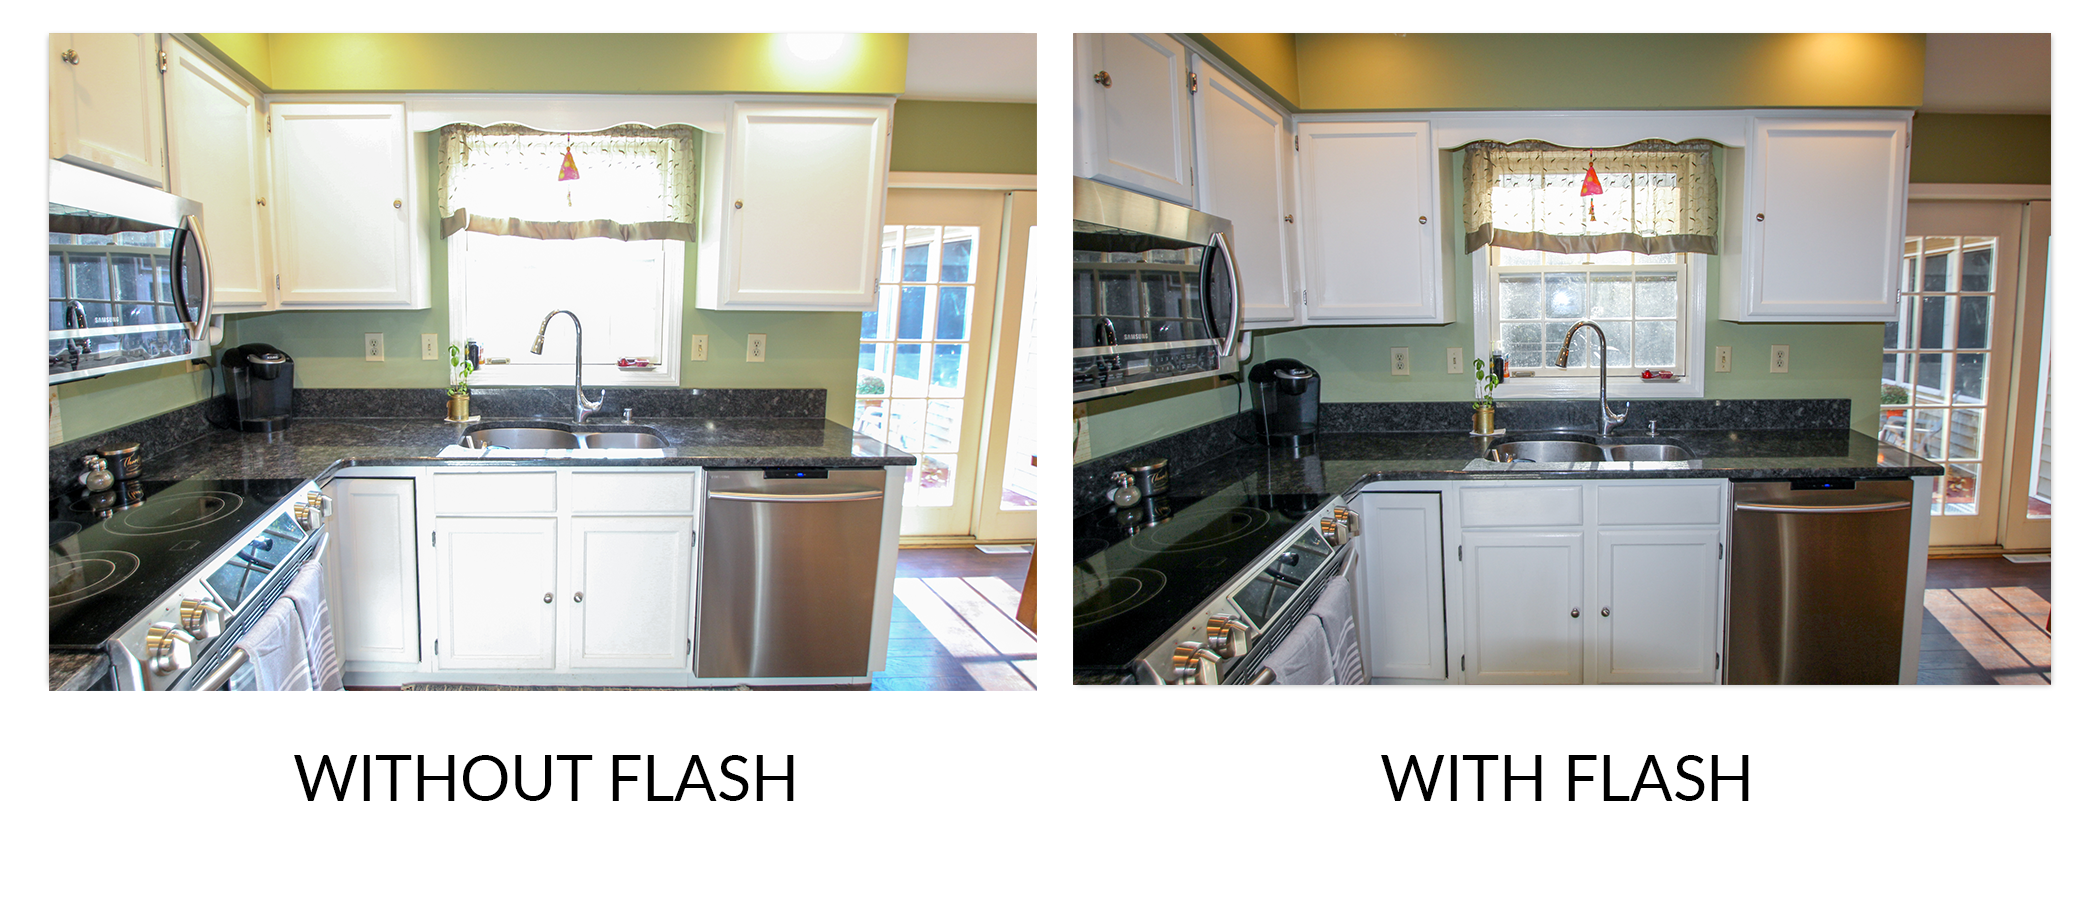 These two photos may not look that different, but the key is in the window. Without flash, the bright light from the window washes out into pure whiteness. With flash, the light of the room is evenly matched with the light of the window. We can see more of the detail of the window itself, and even what’s outside. With flash, you have more clarity and definition. Be careful though, watch for shadows caused by the flash being blocked from reaching the whole room.
TIP 4: Invest in a wide-angle lens
The more photos you take, the better you will get and the easier it will be. As a beginner, you may be wary of spending money on a camera to get started. There are tons of great beginner cameras that won’t break your bank. However, many of these cameras are geared toward everyday shooting, not real estate. The lens that will come with a new camera (called the kit lens) is suitable for family parties, sporting events, and even portraits. Real estate photography requires a lens that will show off a whole room in one photo. This requires a wide angle lens. This first comparison shows a lot. With the lens that comes with your camera, you can see this living room pretty well. However, when you compare it to the wide angle lens, there is a clear advantage. The kit lens allows us to see two walls of the room; the wide angle shows us three! We are able to see the whole space, with minimal distortion. Here’s another:
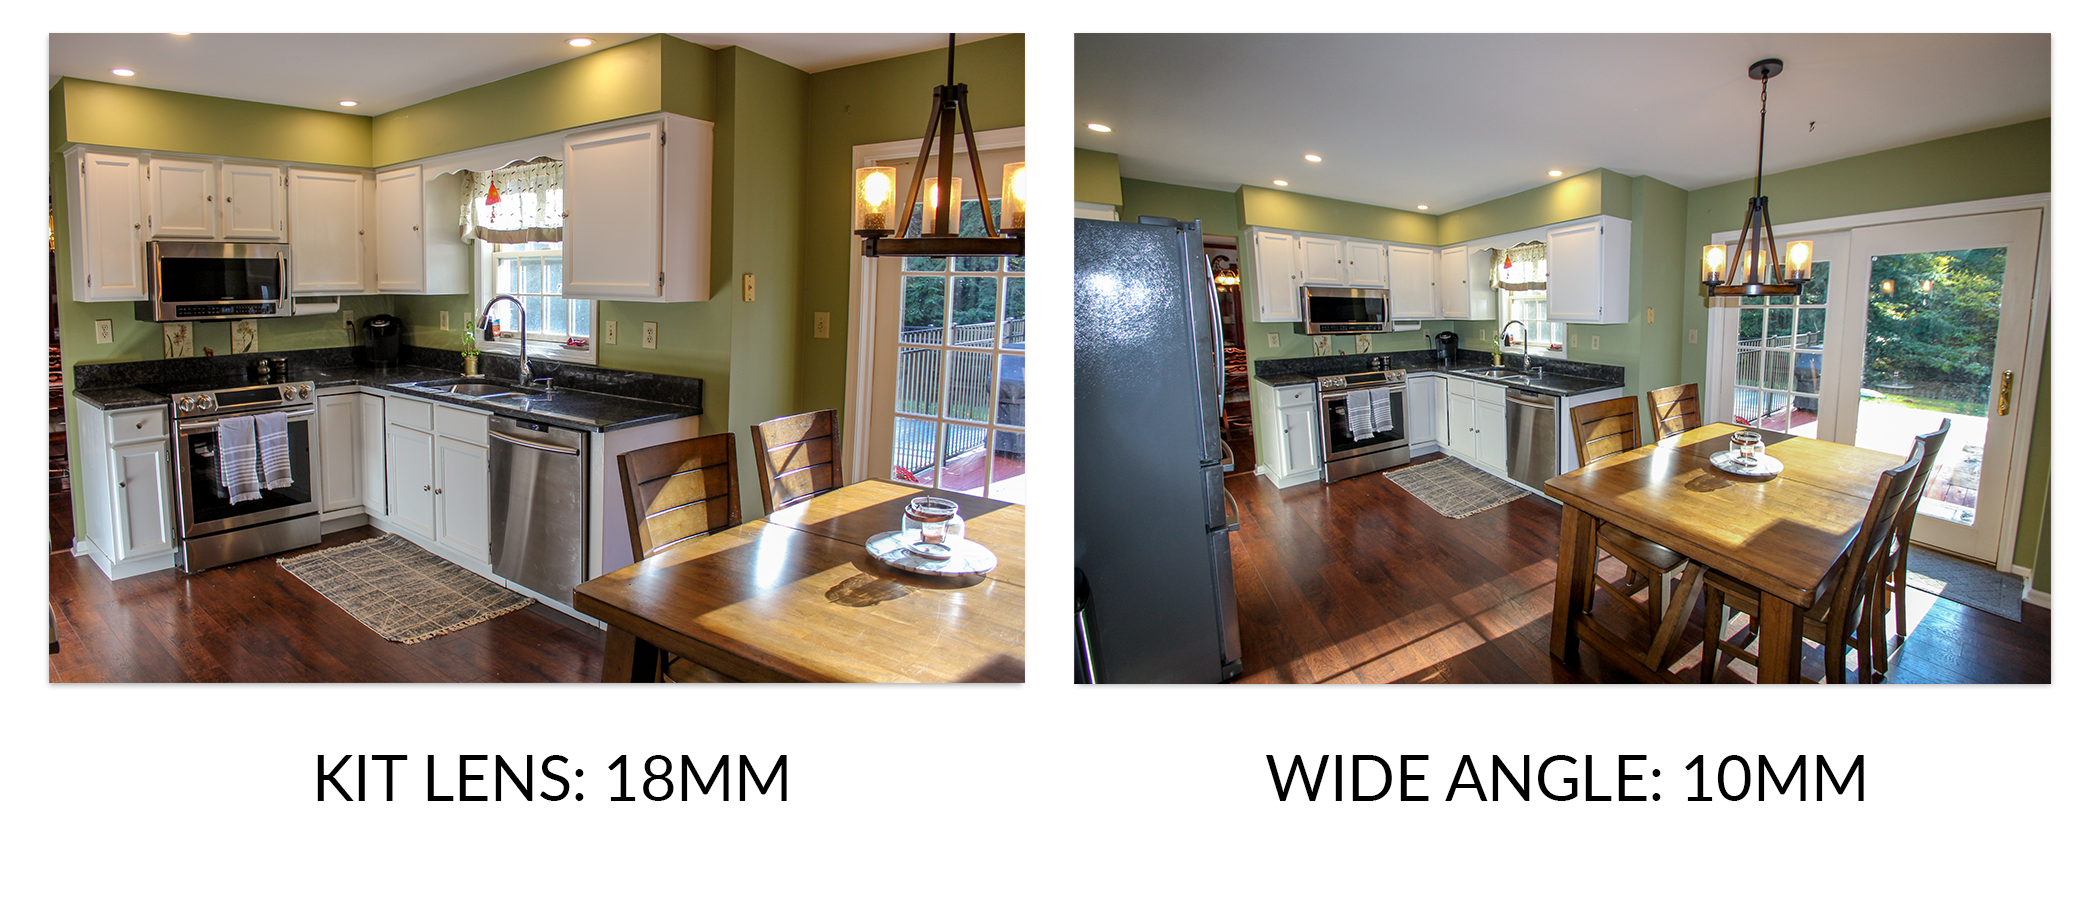 Look at how much more open this kitchen feels. You can even see into the dining room a little. The lens we used here is a Canon 10-22mm. On Amazon, it runs about $600 new. That may seem like a steep price tag, but if you think about the return on that investment with the quality of your photos, it’s worth it. When your listing sells and you collect a closing check, the lens will pay for itself!
TIP 5: Edit your Photos
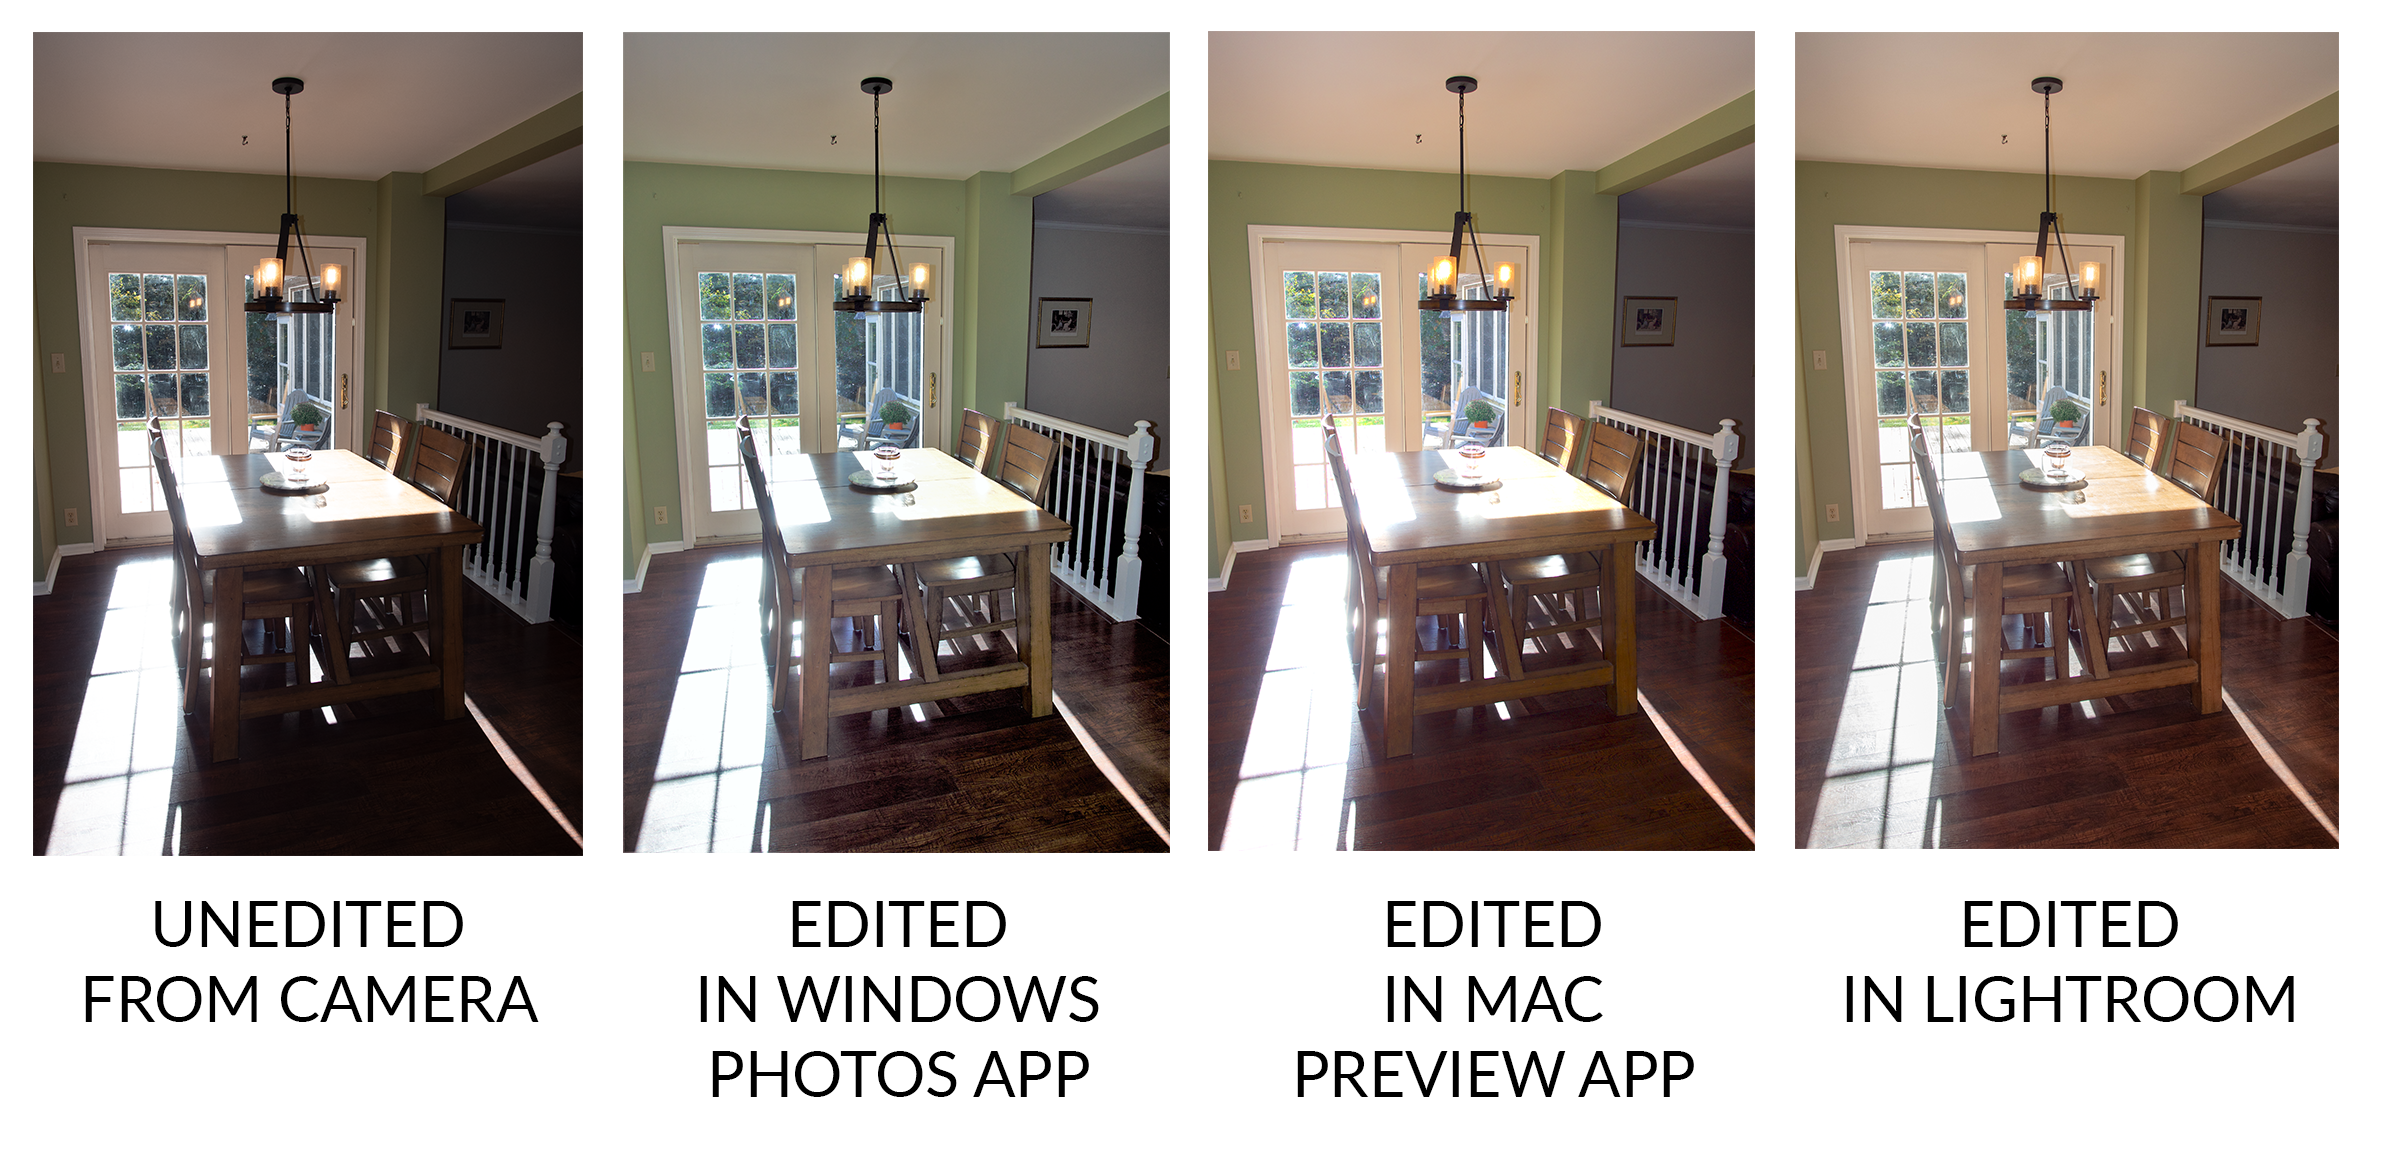 Can you see the difference in the unedited version? Here is how to reach the editing panel on either platform. On a Windows machine, open the photo in the Photos app. In the top right, open the “Edit & Create” Tab and select Edit. On the right side, open the “Adjust” panel. On a Mac, open the photo in the Preview app. Go to Tools, then Adjust Color. A window will pop up.
For either platform, my standard preset for listing photos is to lower the highlights (this dims down the bright whites) and boost the shadows (this lightens the dark areas). I increase the exposure a bit to brighten the image, and maybe lower the contrast (this will even out the lights and darks).
Next, I go to the color section. There will be two sliders, warmth and tint. Warmth changes your image between yellow and blue. Tint changes the image between green and pink. In the Mac Preview App, there is a little eyedropper that will allow you to choose a neutral gray object in your image and it will automatically adjust your color. In the Windows Photos app, you can even do a little bit of spot removal to get rid of dust, or a distracting face plate.
Don’t spend too much time on each image. Trust your eyes to see what looks good. In the Preview app, you can copy the settings from one photo and apply it to a second one. This is great for multiple angles of the same room!
That’s it! 5 Simple Tips to Improve your Listing Photos. Get out there and start shooting! Are there any other helpful tips that we didn’t mention? What is the most difficult part about shooting listing photos? Leave a comment below, we would love to help!